


Localization, the process of providing information in multiple languages as specified by the user, is a pretty common requirement for web apps. ASP.NET Core has had good support for localization since its release. Some apps attempt to implement localization using if or switch statements in their controllers, but this results in a lot of complex and unnecessary code, and very bloated controllers. A better approach is to leverage the built-in support for localization.
You’ll find a working demo of localization in ASP.NET Core API apps on NimblePros’ GitHub.
Required Services
In your application’s startup (typically in Program.cs or Startup.cs) you’ll need to add support for localization and then configure it like so:
builder.Services.AddLocalization();
builder.Services.Configure<RequestLocalizationOptions>(
    options =>
    {
        var supportedCultures = new List<CultureInfo>
        {
            new CultureInfo("en-US"),
            new CultureInfo("en-AU"),
            new CultureInfo("de-DE")
        };

        options.DefaultRequestCulture = new RequestCulture(culture: "en-US", uiCulture: "en-US");
        options.SupportedCultures = supportedCultures;
        options.SupportedUICultures = supportedCultures;
    });
As you add support for additional languages/cultures, it’s important to remember to add them to your list of supported cultures here.
Additionally, you can set up request localization in your app’s middleware configuration:
var localizeOptions = app.Services.GetService<IOptions<RequestLocalizationOptions>>();
app.UseRequestLocalization(localizeOptions.Value);
This is used to allow the app to gather the requested language/culture from incoming requests.
Resource Files
The simplest way to implement localization in ASP.NET Core API apps is through the use of resource files, which have a .resx extension. Once added to your project, you can edit these with key-value combinations, where the key relates to a particular message. Typically you create a default file, and then separate locale-specific files that override the default when a request asks for that locale. An example locale string is “en-US” or “de-DE” which are “English, United States” and “German, Germany” respectively. These are referred to sometimes as language tags; the W3C has more information on language tag. Here are some lists of available language tags on Stack Overflow.
It’s important to name the resource files with the locale specified before the .resx extension and after the common name for the resource file. For example:
- Messages.resx
- Messages.de-DE.resx
- Messages.en-US.resx
If you’d rather store your messages in a database, there are a few articles on how to do that:
Localizing a Response
Now let’s look at an API endpoint that needs to return a localized message as part of its response. The key is to inject an instance of IStringLocalizer<Messages> where Messages is the name of your resource file (its generated class name). Then in the endpoint itself, you can fetch a localized string by simply requesting the key index from the localizer service:
var localizedString = _localizer["Greeting"];
The complete greeting endpoint class is here:
using Ardalis.ApiEndpoints;
using LocalizationDemo.Resources;
using Microsoft.AspNetCore.Mvc;
using Microsoft.Extensions.Localization;
using Swashbuckle.AspNetCore.Annotations;

namespace DL.Backend.Web.Endpoints.LanguageEndpoints;
public class Greeting : EndpointBaseAsync
    .WithRequest<GreetingRequest>
    .WithActionResult<GreetingResponse>
{
    private readonly IStringLocalizer<Messages> _localizer;
    private readonly ILogger<Greeting> _logger;

  public Greeting(
      IStringLocalizer<Messages> localizer,
    ILogger<Greeting> logger)
  {
        _localizer = localizer;
        _logger = logger;
    }

    [HttpGet("/Greeting")]
  [SwaggerOperation(
      Summary = "Returns a localized greeting",
      Description = "Returns a localized greeting",
      OperationId = "DL.Greeting",
      Tags = new[] { "LanguageEndpoints" })
  ]
    public override async Task<ActionResult<GreetingResponse>> HandleAsync([FromQuery]GreetingRequest request,
      CancellationToken cancellationToken = default)
    {
        var localizedString = _localizer["Greeting"];

        _logger.LogDebug("Localized String: name={0};value={1};\nresourceNotFound={2};searchedLocation={3}", localizedString.Name,
          localizedString.Value, localizedString.ResourceNotFound, localizedString.SearchedLocation);

        var response = new GreetingResponse {
            GreetingFormatString = localizedString.Value,
            Greeting = String.Format(localizedString.Value, request.Name)
            };

        return Ok(response);
    }
}
Testing it out
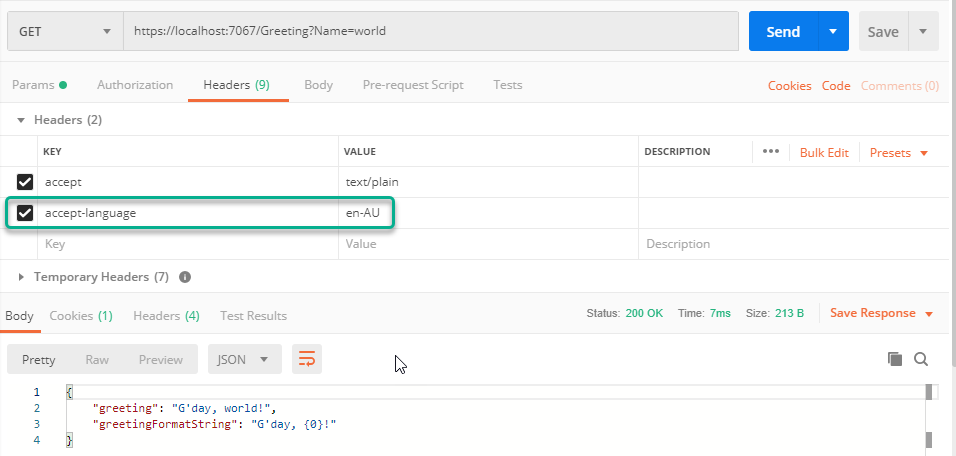
To test whether the localization is working, you can simply pass a header with the desired language tags to the API endpoint using a tool like Postman. The default header used is Accept-Language, as shown in this screenshot where the language has been set to “English, Australian”:
Summary
Don’t use conditionals to output localized messages in your ASP.NET Core apps (APIs or otherwise). Instead, use the built-in support for localization and the IStringLocalizer<T> service along with resource files or another means of getting the appropriate message in the appropriate language and region.