

This post is the second in a series on NServiceBus. In the previous article, we looked at What is NServiceBus. In this article, we will look at how to get started with NServiceBus in .NET 8. All code for this article can be found in the NServiceBusTutorial repository on GitHub.
Prerequisites 📝
For this tutorial, we will use the Ardalis CleanArchitecture template. It’s worth noting that you do not need to use this template to use NServiceBus. But it is a good starting point for building a .NET application and our sample domain will be based on the entities and actions found in that solution. You can find the project template here or install it as a dotnet CLI template using the following command:
dotnet new install Ardalis.CleanArchitecture.Template::9.1.2
Then, in a new directory, run:
dotnet new clean-arch -o NServiceBusTutorial
This will give you a new solution with a few projects and a sample domain. You can find more information about the template and its structure in the Ardalis.CleanArchitecture README. For this tutorial, this project will give us a .NET web application with CRUD functionality for a Contributor entity which we can use to demonstrate how NServiceBus can be used to send and receive messages. Let’s dive right into sending an event when a new Contributor is added to the system.
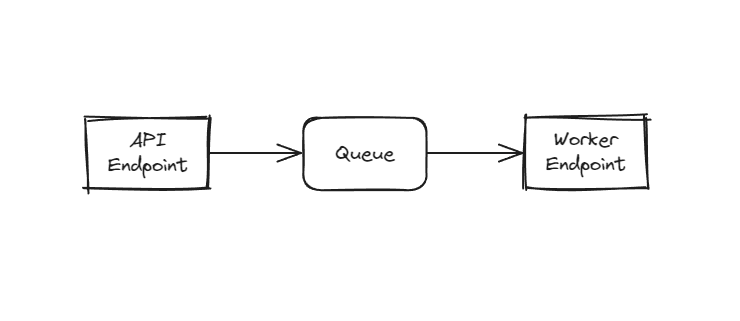
The sample applications we’ll be building in this project will be a .NET web application and a .NET worker service. The web application will be used to send a message when a new Contributor is added to the system, and the worker service will be used to receive the message. Below is a simple architecture diagram of the applications and the queue between them.
Adding NServiceBus to the Project ➕
To add NServiceBus to the project, we will use the NServiceBus NuGet package. You can find the latest version of the package on NuGet. To add the package to the project, run the following command at the root of the solution:
dotnet add src/NServiceBusTutorial.Core/NServiceBusTutorial.Core.csproj package NServiceBus --version 8.1.6
This will add the NServiceBus package to the Core project. The Core project is where we will define our messages so that they can be shared between the web application and the endpoint that will process the messages. There is a noteworthy tradeoff taking a dependency on NServiceBus in the Core project. It will allow us to share the message definitions between the sending and receiving endpoints, but it will also mean that the Core project will have a dependency on NServiceBus. In larger applications or projects that span multiple repositories, you may move this shared message contract to a library that many projects can consume. This is a tradeoff that you will need to consider when designing your application. For this tutorial, we will take the tradeoff and add the NServiceBus package to the Core project.
Defining a Message 📨
In the Core project, we will define a message that will be sent when a new Contributor is added to the system. We will call this message ContributorCreated. We will define the message as a class that implements the IMessage interface from the NServiceBus package. The IMessage interface is a marker interface that is used to identify a class as a message. The message will contain the ContributorId, Name, and Status of the new Contributor. The message will look like this:
public class ContributorCreatedEvent : IMessage
{
  public Guid ContributorId { get; init; }
  public string Name { get; init; }
  public string Status { get; init; }
}
That’s it, we’ve defined our first NServiceBus message! Now, let’s send this message when a new Contributor is added to the system.
Configuring The Web Project Endpoint 🌐
To configure the NServiceBusTutorial.Web project as an endpoint, we will need to add the NServiceBus.Extensions.Hosting NuGet package.
dotnet add src/NServiceBusTutorial.Web/NServiceBusTutorial.Web.csproj package NServiceBus.Extensions.Hosting --version 2.0.0
In the Program.cs file in NServiceBusTutorial.Web we will register NServiceBus and its dependencies with our application. Typically, you will register the routing of messages, the transport mechanism for your persistence of messages, and additional NServiceBus configuration in this method. For this tutorial, our configuration is relatively simple. We set up a simple send-only endpoint using LearningTransport, define a route for a single message, and enable installers to create the necessary infrastructure for our endpoint.
builder.Host.UseNServiceBus(_ =>
{
  var endpointConfiguration = new EndpointConfiguration("contributors-api");

  var transport = endpointConfiguration.UseTransport<LearningTransport>();

  transport.Routing().RouteToEndpoint(
    typeof(ContributorCreatedEvent),
    "contributors-worker");

  endpointConfiguration.SendOnly();
  endpointConfiguration.EnableInstallers();

  return endpointConfiguration;
});
A Quick Note on the Learning Transport 🧠
In this tutorial, we are using the Transport, LearningTransport, which is an abstraction for defining the underlying persistence and queueing technology for your messages. LearningTransport is a Transport that is included with NServiceBus and is used for development and testing. It is not recommended for production use. We’ll revisit how Learning Transport works in a future article. For now, it is sufficient to know that it is a file system-based Transport that can be used to send and receive messages in a development environment. These messages will be written to the root of the repository in a folder called .learningtransport.
Sending a Message 📤
In the UseCases layer, we will send the ContributorCreatedEvent message when a new Contributor is added to the system. We will inject the IMessageSession interface into the CreateContributorHandler and use it to send the ContributorCreatedEvent message. The IMessageSession is NServiceBus’s interface for sending messages outside the context of a message handler (which we’ll see in a bit). The CreateContributorHandler will look like this:
var newContributor = new Contributor(request.Name, phoneNumber, ContributorStatus.NotSet);
var createdItem = await _repository.AddAsync(newContributor, cancellationToken);

var message = new ContributorCreatedEvent
{
  ContributorId = createdItem.Id,
  Name = createdItem.Name,
  Status = createdItem.Status.ToString()
};
await _messageSession.Send(message, cancellationToken);

return createdItem.Id;
That’s it! We are now able to send our first NServiceBus message This should look familiar if you’ve used a package like MediatR or an equivalent, with the difference that NServiceBus messages are being sent out of process and not in-process in this example. Now, let’s set up a .NET worker service to receive the message.
Setting Up a Worker Service Endpoint 🛠️
Now that our code to send a message is in place, we will set up a new endpoint to receive the message in a .NET worker service. First, we’ll create a new project called NServiceBusTutorial.Worker using the following command:
dotnet new worker -n NServiceBusTutorial.Worker -o src/NServiceBusTutorial.Worker
Then, we will add the project to our Solution file using the following command:
dotnet sln add src/NServiceBusTutorial.Worker/NServiceBusTutorial.Worker.csproj
Next, we will add the NServiceBus.Extensions.Hosting NuGet package to the NServiceBusTutorial.Worker project just like we did for the NServiceBusTutorial.Web project.
dotnet add src/NServiceBusTutorial.Worker/NServiceBusTutorial.Worker.csproj package NServiceBus.Extensions.Hosting --version 2.0.0
We can delete the Worker.cs file that was created by default as we won’t be using it. Then, we’ll update the contents of the Program.cs file to configure the Worker’s IHost as an endpoint. Similar to the NServiceBusTutorial.Web project, we will call the UseNServiceBus method but our endpoint will be the receiving name for the route we configured in the previous Transport. We’ll again use LearningTransport for this demo. The Program.cs file will look like this:
using NServiceBus;

var builder = Host.CreateDefaultBuilder();

builder.UseConsoleLifetime();
builder.UseNServiceBus(context =>
{
  var endpointConfiguration = new EndpointConfiguration("contributors-worker");
  endpointConfiguration.UseTransport<LearningTransport>();

  return endpointConfiguration;
});

var host = builder.Build();
host.Run();
This is all that is needed to set up our worker Service as an endpoint that can send and receive messages. Now, let’s create a message handler to process the ContributorCreatedEvent message.
Creating a Message Handler 📭
In the NServiceBusTutorial.Worker project, we will create a new class called ContributorCreatedEventHandler that will implement the IHandleMessages<ContributorCreatedEvent> interface. This interface is used to identify a class as a message handler for the ContributorCreatedEvent message. NServiceBus will register this detect and register this handler automagically 🪄 so there is no need to do any manual configuration for this class. For this sample, we will simply log that we received the message and the Id of the Contributor from the message body.
public class ContributorCreatedEventHandler(ILogger<ContributorCreatedEventHandler> logger)
  : IHandleMessages<ContributorCreatedEvent>
{
  private readonly ILogger<ContributorCreatedEventHandler> _logger = logger;

  public Task Handle(ContributorCreatedEvent message, IMessageHandlerContext context)
  {
    _logger.LogInformation("Received {EventName} for {ContributorId}",
      nameof(ContributorCreatedEvent),
      message.ContributorId);
    return Task.CompletedTask;
  }
}
That’s it! We are now able to receive our first NServiceBus message. We have set up a default IHost as a worker service to receive the ContributorCreatedEvent message and log the Contributor’s Id. Now, let’s run the application and see it in action.
Running the Application 🏃♂️
Below is a gif that shows two console outputs from the NServiceBusTutorial.Web and NServiceBusTutorial.Worker projects. The bottom console output shows the NServiceBusTutorial.Web project running which receives a POST request which creates a Contributor and sends the ContributorCreatedEvent. The top console output shows the NServiceBusTutorial.Worker project receiving the ContributorCreatedEvent message and logging the ContributorId when it is received.
Conclusion 🎬
In this article, we looked at how to get started with NServiceBus in .NET 8. We added the NServiceBus package to the Core project and defined a message that will be sent when a new Contributor is added to the system. We then configured the NServiceBusTutorial.Web project as an endpoint and sent the ContributorCreatedEvent message when a new Contributor is added to the system. We then set up a new endpoint in the NServiceBusTutorial.Worker project to receive the ContributorCreatedEvent message and log the ContributorId when it is received. In the next article, we will look at different types of messages like commands and events, the differences in how they are sent and received, and some small changes we can make to our code to reflect these differences.