Git’s pretty great. It’s very configurable and customizable. One of the many options it offers is telling Git who you are when you make a commit. Providing a name and e-mail address is fairly standard these days, and Git will happily accept whatever values you give it within your configuration.
git config user.name "Your Name Here"
git config user.email "some-email@example.com"
With that freedom, how can others know that it’s really you that authored a particular commit in a repository? Git itself doesn’t perform any identity verification for those fields, so if someone else authored a commit and said their e-mail was scott.depouw@example.com, they could impersonate me. After all, I author commits with the same name. How can a third party verify I’m the real Scott?
By signing!
What is a Signed Git Commit?
A signed commit is merely a commit whose information also contains a private key that some other entity (in this post and example, GitHub) uses to authenticate the author information. When done correctly, the other entity confirms the identity of the commit.
This is represented in GitHub with a Verified badge next to the commit.
Verified commits displayed on GitHub
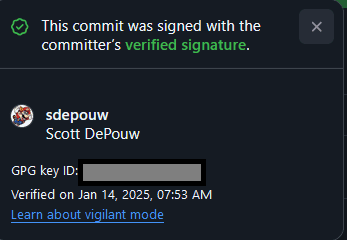
You can click the badge to get additional details. (While I did blank out the GPG key ID in this screenshot, it’s actually fine to share since that’s the public part of the key.)
Details about a verified commit.
With signing in place, anyone else on the same platform can be assured that the author of these commits is, indeed, me!
Vigilant Mode
You might have noticed the “vigilant mode” mention in the previous screenshot. In GitHub, you can enable this setting to make any unsigned commits have an “unverified” badge. Anyone anywhere trying to use your author information on GitHub will have their commits marked with that “suspicious” marker! This works retroactively, which means your own actual commits will get marked similarly.
Creating the GPG Key for Commits
Every device that you perform Git actions on will require its own signing key. In order to use a key, we have to create one, then tell GitHub about it so that it associates our key with our GitHub account.
First, we need access to the gpg program. If you have Git installed on your machine, it is already available. For me, it was found in C:\Program Files\Git\usr\bin\. Open a command prompt or PowerShell in that directory, and get started by running the following command:
gpg --full-generate-keyThis will launch you into a creation wizard within the command prompt window, asking for several pieces of information. I’ll walk you through the various steps now!
- For the initial option of what kind of key to create, select
(1) RSA and RSA - Enter
4096for the bit size - Expiration can be whatever you desire. I opted for 1 year.
- Now comes the time to enter your personal information. The
NameandCommentfields can be whatever you wish. However, theEmailfield must match your GitHub e-mail precisely! Whatever you’re using ingit config user.emailis what you must enter for this field. - You will then be prompted to confirm all of the above information.
- Finally, a passphrase can be created. This will cause a password prompt to appear whenever you attempt to commit using this key.
- This is optional and up to you whether you wish to have one.
- I don’t know exactly how long it remembers your passphrase, though in my experience it will retain it if you are committing frequently. If you leave enough time between commits, it will prompt you again.
Here’s what the output was when I made mine (this key has been deleted and is expired, so it’s safe to share):
We need to generate a lot of random bytes. It is a good idea to perform
some other action (type on the keyboard, move the mouse, utilize the
disks) during the prime generation; this gives the random number
generator a better chance to gain enough entropy.
We need to generate a lot of random bytes. It is a good idea to perform
some other action (type on the keyboard, move the mouse, utilize the
disks) during the prime generation; this gives the random number
generator a better chance to gain enough entropy.
gpg: /path/to/.gnupg/trustdb.gpg: trustdb created
gpg: directory '/path/to/.gnupg/openpgp-revocs.d' created
gpg: revocation certificate stored as '/path/to/.gnupg/openpgp-revocs.d/A2FE4621EE707551CA002097DEFCEADDEB4CD823.rev'
public and secret key created and signed.

pub   rsa4096 2025-01-02 [SC] [expires: 2025-01-03]
      A2FE4621EE707551CA002097DEFCEADDEB4CD823
uid                      Scott DePouw (NimblePros) <scott.depouw@nimblepros.com>
sub   rsa4096 2025-01-02 [E] [expires: 2025-01-03]
Providing Our Key to GitHub
Now we have a GPG key! We need to associate it to our GitHub account so that GitHub can validate any keys we send along with our commits. To do so, we must export our key.
Take the pub portion of our key (in the above, mine is A2FE4621EE707551CA002097DEFCEADDEB4CD823), and run gpg with the --export flag:
gpg --armor --export A2FE4621EE707551CA002097DEFCEADDEB4CD823This will give you the full PGP public key block that GitHub requires. I slimmed down the full output but kept the start and ends:
-----BEGIN PGP PUBLIC KEY BLOCK-----

mQINBGd2bIcBEAC10v7P1rTyg13bbuqCwYy4LUgYT3jhOowVygXN2PVG2FcybkAF
/RIJnrW61gP5piG9drSZRTTcI19m7IuYM0nLr5IPbdOpKFkMgWlPxlfFDtx18nRj
[removed the bulk for brevity]
prXJz6aRecUrLYMub6NUVFWL1e9iHMcTy4nrO0rCfceprA==
=o4fM
-----END PGP PUBLIC KEY BLOCK-----
Armed with your key, let’s go to GitHub! After logging in, go to “SSH and GPG keys” within account settings, and click the “New GPG Key” (green button), pasting in your key and leaving a friendly Title. In my title I put the purpose (work, personal, etc.) alongside the expiration date for convenience. If you have multiple devices, the Title is a good place to put that as well! I got a new PC recently, and here’s what the entry for it looks like. In this case I set the expiration for 2 years. The actual key information is again removed from the screenshot.
GitHub’s record of the public key I provided for my new PC.
Using Your Key to Sign Commits in Git
We have our key, and GitHub knows about it. The final step is to tell Git to sign our commits with the key. To get started, we first need to inform Git of where the GPG program is. As mentioned previously, installing Git automatically provides a copy of gpg:
git config --global gpg.program "C:\Program Files\Git\usr\bin\gpg.exe"We now need to tell Git which key to use. To get the key to provide, run the following gpg command:
gpg --list-secret-keys --keyid-format=longThis should result in a listing something like this (no censorship here as this key has been deleted):
gpg: checking the trustdb
gpg: marginals needed: 3  completes needed: 1  trust model: pgp
gpg: depth: 0  valid:   1  signed:   0  trust: 0-, 0q, 0n, 0m, 0f, 1u
gpg: next trustdb check due at 2025-01-03
[keyboxd]
---------
sec   rsa4096/DEFCEADDEB4CD823 2025-01-02 [SC] [expires: 2025-01-03]
      A2FE4621EE707551CA002097DEFCEADDEB4CD823
uid                 [ultimate] Scott DePouw (NimblePros) <scott.depouw@nimblepros.com>
ssb   rsa4096/6C6719AD663F40D1 2025-01-02 [E] [expires: 2025-01-03]
From the above output, copy either DEF... (the “sec”, or secret key) or 6C6... (the “ssb”, or secret subkey).
At any point you can delete these keys with:
gpg --delete-secret-key DEFCEADDEB4CD823Configure Git via the user.signingkey setting. Like with any other config you can do this globally or per-repository, depending on your needs.
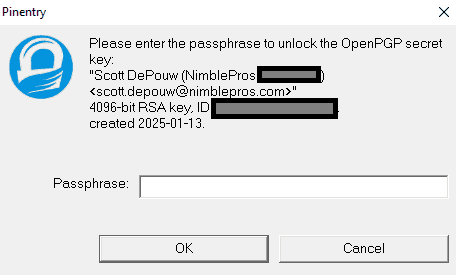
git config user.signingkey DEFCEADDEB4CD823Now whenever you commit, pass the -S flag in order to Sign your commit. For the first time in your session, GPG will prompt you for the passphrase (if it has one) you created when making the key.
git add README.md
git commit -m "Updated README with notes" -S
The passphrase prompt when signing commits.
Configure Git to Always Sign
I highly recommend instructing Git to always sign commits so you don’t have to explicitly pass the -S flag every commit.
git config commit.gpgsign true
git config tag.gpgsign true
Notice that tags can also be signed!
With all the pieces in place, you can now have verified commits on GitHub, so everyone visiting the repositories you contribute to will know for a fact that you were the author of these commits.
Summary
Overall it’s not too bad to set all this up, though it does take some work. Once you do it, however, you’re set for however long you set your key’s expiration for (or until you get a new device, e-mail, and so on).
You can always come back to this post when you need to configure another key!
References
This took some digging to connect all the dots. Here’s what I used in order to put this all together.


