Introduction
Unit Testing is easy on greenfield but hard on legacy code.
You’ve gone through the initial steps of extracting the troublesome dependencies for your legacy code (system clock, file system, database access). But there’s still a LOT of code and you’re unsure where to start.
I think, at this point, we all understand the importance and the benefit of automated testing (whether unit tests or integration tests). Every coding tutorial or architecture template you look at includes some samples with tests. And this is great. There used to be a stigma with testing in the past. Whether or not they add value; whether they take up too much time from actual development. I’m happy to see that, as a development community, we’re largely past that.
What doesn’t seem to be as readily available is instructions on what to do with Legacy Code. You know the drill - you’ve inherited a codebase that’s more spaghetti than structure, and you’re tasked with making it better. But all the textbook rules and best practices on unit testing don’t seem to fit. How do you refactor without breaking everything?
Enter characterization tests. These nifty little tests, as defined by Michael Feathers, are designed to capture the current behavior of your system, warts and all. They’re not about testing what the code should do, but what it actually does. Think of them as a safety net for your refactoring trapeze act. That way, you can refactor to your heart’s content without fear of breaking things.
But here’s the rub: writing these tests can be a pain, especially when you’re dealing with complex objects or code with more branches than a tree. That’s where we’re going to introduce some cool tools to make our lives easier.
The Problem with Manual Characterization Tests
They can be tedious to write. As an example, we’ll use the ValidateAndAddProduct Refactoring Kata. Consider this snippet of the ValidateAndAdd method (original is 102 lines long) from the ProductService:
public Response ValidateAndAdd(ProductFormData productData)
{
    if ("" == (productData.Name))
    {
        return new Response(0, -2, "Missing Name");
    }
    if ("" == (productData.Type))
    {
        return new Response(0, -2, "Missing Type");
    }
    Product product = new Product(productData.Name);
    product.Type = ("Unknown");

    if ("Eyeshadow" == (productData.Type) || "Mascara" == (productData.Type))
    {
       // more branches and logic
    }
    product.Range = (ProductRange.BUDGET);
    if (productData.PackagingRecyclable)
    {
        // something awesome here
    }
    if ("Foundation" == (productData.Type))
    {
        // code...
    }
    if ("Mascara" == (productData.Type))
    {
        // excitement!!
    }
    if (productData.Weight < 0)
    {
        return new Response(0, -3, "Weight error");
    }

    product.Weight = (productData.Weight);

    // ... more branching
    // ... more validation
    // ... more mutation of product

    return new Response(_db.storeProduct(product), 0,
       "Product Successfully Added");
}
There’s a lot going on here:
- Some validation on
productDatawith some early (and not so early) returns. - Creating a
productobject fromproductData. - A lot of mutation of the
productobject based on various rules.
I already have a few ideas of how I’d change this code:
- The
Responseobject can hold a value or validation errors. Probably a decent place to apply Ardalis.Result. - There’s a lot of high-level branching on
Type. We could use the Rules Engine Pattern here.
But before we get started let’s write some characterization tests. Let’s assume we have the following test file: CharacterizationTests/ValidateAndAdd.cs;
Unknown Types
[Fact]
public void WhenUnknownType_Returns0StatusCodeAndUnknownMessage()
{
    // arrange
    var productData = new ProductFormData("My Name", "MyType", 5D, 10D, false);

    // act
    var response = _sut.ValidateAndAdd(productData);

    // assert
    response.ProductId.Should().Be(FakeGeneratedProductId);
    response.StatusCode.Should().Be(-1);
    response.Message.Should().Be("Unknown product type MyType");
}
Ok, that wasn’t so bad.
Happy Path
[Fact]
public void WhenTypeEyeshadow_ReturnsValidProductWithValidInputs()
{
    // arrange
    var productName = "My Name";
    var productType = "Eyeshadow";
    var weight = 5D;
    var suggestedPrice = 10D;
    var packagingRecyclable = false;

    var productData = new ProductFormData(productName, productType, weight, suggestedPrice, packagingRecyclable);

    // act
    var response = _sut.ValidateAndAdd(productData);

    // assert
    response.ProductId.Should().Be(FakeGeneratedProductId);
    response.StatusCode.Should().Be(0);
    response.Message.Should().Be("Product Successfully Added");

    _db.Product.Name.Should().Be(productName);
    _db.Product.Type.Should().Be(productType);
    _db.Product.Weight.Should().Be(weight);
    _db.Product.Family.Should().Be(ProductFamily.EYES);
    _db.Product.Range.Should().Be(ProductRange.BUDGET);
}
Ok, we’ve tested about 2 branches; a lot more to go.
Parameters
Some of you with a keen eye probably saw where we could parameterize this test. That should give us a ton of coverage.
[InlineData("Name", "Eyeshadow", 5D, 10D, false, ProductFamily.EYES, ProductRange.BUDGET)]
[InlineData("Name", "Mascara", 5D, 10D, false, ProductFamily.LASHES, ProductRange.BUDGET)]
// ... more cases here
public void WhenTypeIsValid_ReturnsValidProductWithValidInputs(string productName, string productType, double weight, double suggestedPrice, bool packagingRecyclable, ProductFamily expectedFamily, ProductRange expectedRange)
{
    // ....
}
Now, https://ardalis.com/which-is-more-important-line-coverage-or-branch-coverage/ isn’t the goal here, but it’s a decent metric of how much work we have left to do to gather confidence. These 2 tests get me up to 29% coverage. Which isn’t bad, but getting there was not trivial. We’d then have to expand that with all of the other cases and some more validation.
Let’s see if we can do better.
Enter Verify and Bogus
Verify is a snapshot testing tool that captures the entire state of an object, while Bogus is my favorite library for generating realistic and random test data. You could generate data in many ways, using the built-in Random class or something like AutoFixture.
For a deep dive on Bogus, check out this article: Creating Domain-Driven Test Data With Bogus.
Random Input - A Lot of It
private static readonly string[] ProductTypes =
  ["Eyeshadow", "Eyeshadow Queen", "Mascara",
   "Foundation", "Lipstick", "Blusher", "Foundation",
   "Empty", ""];

private readonly Faker<ProductFormData> _faker = new Faker<ProductFormData>()
  	.StrictMode(true)
    .UseSeed(8675309) // making Bogus deterministic between runs.
    .RuleFor(x => x.Name, f => f.Commerce.ProductName())
    .RuleFor(x => x.Type, f => f.PickRandom(ProductTypes))
    .RuleFor(x => x.Weight, f => f.Random.Number(-1, 99))
    .RuleFor(x => x.SuggestedPrice, f => f.Random.Number(-1, 99))
    .RuleFor(x => x.PackagingRecyclable, f => f.Random.Bool())
  ;
Here we’re setting up Bogus to generate random instances of ProductFormData.
One thing that’s very important to note is UseSeed(....) in the setup of the _faker. Bogus, by default, will pick random values to populate the properties with. And that’s often not a problem. In this case, however, we are looking to generate a random, but repeatable set of input data. We don’t want these value shifting from under us in-between test runs.
Now for our characterization test:
[Fact]
public Task WhenRunMultipleTimes_ReturnsVerifiedResults()
{
    // arrange
    const int numberOfRuns = 50; // high enough for a decent confidence level

    var data = _faker.Generate(numberOfRuns); // 50 random instances of ProductFormData

    var results = new List<object>();
    foreach (var productData in data)
    {
        // act
        var response = _sut.ValidateAndAdd(productData);

        var result = new
        {
            Input = productData,
            Response = response,
            Product = _db.Product
        };

        results.Add(result);
    }

    // assert
    return Verify(results);
}
We’re generating 50 random input values with varying combinations of data. We then run this repeatedly and use the results list to aggregate the results (just an anonymous object containing the input and output).
The goal here is to try to cover as many cases as we can, with as little (initial) effort as possible. Leaning on the tools to make the task easier. We’re picking random types (some known and unknown), different weights, suggested prices, etc. We’re not trying to cover every difference combination of inputs, just enough.
There’s nothing magic about the number 50 in the code above. I experimented with the number until the the code coverage in my IDE got to a sweet spot and further increases didn’t move the needle much. How do you get code coverage results from your IDE without shelling out for expensive subscriptions? I’m glad you asked.
The Results
The Verify(results) line then serializes the whole thing and gives me a snapshot of the entire thing. It looks a bit like this:
...},
{
  Input: {
    Name: Handmade Frozen Towels,
    Type: ,
    Weight: 50.0,
    SuggestedPrice: 5.0,
    PackagingRecyclable: true
  },
  Response: {
    StatusCode: -2,
    Message: Missing Type
  }
},
{
  Input: {
    Name: Handcrafted Rubber Chips,
    Type: Mascara,
    Weight: 51.0,
    SuggestedPrice: 99.0,
    PackagingRecyclable: false
  },
  Response: {
    Message: Product Successfully Added
  },
  Product: {
    Name: Handcrafted Rubber Chips,
    Type: Mascara,
    Family: LASHES,
    Range: PROFESSIONAL,
    Weight: 51.0
  }
},
... // imagine this goes on 48 more times 🙂
This comes in a file called: ValidationTest.Characterization_Test_WithBogusAndVerify.received.txt. The tool then asks you to accept the results into a file called ValidationTest.Characterization_Test_WithBogusAndVerify.verified.txt. Once this file is saved, subsequent runs of the test will pass, if they produce the same output.
In essence, we have codified that “for these 50 randomly generated combinations of values, here’s what the application does”.
The beauty of this approach is twofold:
- We’re testing multiple scenarios in a single test, covering various code paths.
- We’re capturing the entire state of the input and output.
- We didn’t have to write 50 tests.
Verify will automatically compare this against a stored snapshot, alerting us to any changes in behavior. This means if our refactoring accidentally allows an invalid product through or rejects a valid one, we’ll know immediately.
Is this exhaustive? No. Does it cover every single case? No. But what it did was get me 91% code coverage with very little effort. We can then surgically attack the missing 9% of places we didn’t cover with more manually written tests.
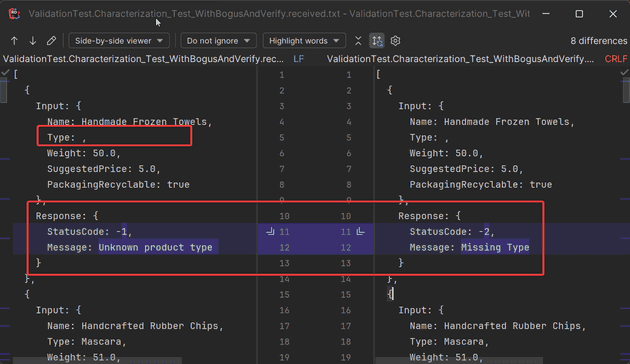
Faking A Refactoring Bug
Let’s see what happens when I accidentally break something
if ("" == (productData.Type))
{
    //return new Response(0, -2, "Missing Type");
}
The integrated diff tools in Rider (it’s also supporting in Visual Studio and Visual Studio Code) show me exactly how things have changed:
Summary
Characterization tests are your secret weapon when tackling legacy code like our ValidateAndAddProduct method. They give us the confidence to refactor and improve our codebase without inadvertently changing its behavior.
By leveraging tools like Verify and Bogus, we can create these tests more easily and comprehensively than ever before. We’re not just testing the happy path or a few edge cases - we’re throwing a variety of realistic data at our code and capturing the full results.
Remember, the goal here isn’t to test if the code is doing the right thing - that’s a job for unit tests once we’ve refactored. Instead, we’re creating a safety net that captures the current behavior, giving us the freedom to improve our code without fear of breaking existing functionality.
So the next time you’re faced with a legacy method that needs some TLC, give this approach a try. Your future self (and your team) will thank you when you can confidently refactor that gnarly ValidateAndAddProduct method into something beautiful and maintainable.
Happy refactoring, folks!


