There are a lot of different tools out there to allow you to manage complicated applications and the infrastructure that you need to develop them. In today’s development world, there’s a lot of different ways that you can approach the architecture of your application, and a lot of different tools to help you along the way. In recent months, however, if you’re developing a cloud ready application, especially one based in .NET, there’s one clear solution to approaching the development of that application: .NET Aspire.
What is .NET Aspire?
If you look at the official documentation, they define .NET Aspire as “a set of tools, templates and packages for building observable, production ready distributed applications”. But what does that actually mean? In short, .NET Aspire is a set of Nuget packages and tools to help you quickly and easily set up and configure the various pieces of your application and how they communicate with each other.
In a typical cloud ready application you’re going to have a lot of different pieces. At the very least, you’re going to have an API, a web app for the UX/UI, and a common library of shared code. You’ll probably also have a data infrastructure, and things like caching or messaging services to support the whole thing. There can be a lot of different pieces to a cloud ready application and it doesn’t matter whether you set it up as a monolithic application, a distributed application, a set of micro services, or any other architecture you can imagine—.Net Aspire can provide you with the means of developing and producing that application faster.
Each of the pieces of functionality to enable that communication and integration is held in a Nuget package, which is easily identified. The first word of each package is “Aspire”. For example: “Aspire.Hosting.AppHost” contains the core functionality for the AppHost project.
There are typically two or three packages for each piece of functionality. The packages that start with “Aspire.Hosting” are to be added to the AppHost project (which we’ll cover in a moment) to hold and configure the setup of that integration. The other package(s) are the ones you will add to the various “client” projects of your application to enable them to implement Aspire’s integrations. For example: “Aspire.Hosting.PostgreSQL” gets added to the AppHost to allow you to set up PostgreSQL functionality and configuration, and “Aspire.Npgsql.EntityFrameworkCore.PostgreSQL” would get added to your API or data project to enable it to implement EntityFramework based access to PostgreSQL databases. There’s a long list of integrations already available from the official packages, as well as the community library, and more are being added all the time.
It should be noted that the Aspire Nuget packages for each client are essentially wrappers for the normal Nuget packages of the same name. The Aspire version just adds the Aspire configuration pieces. In each client application you will replace the Nuget packages you are using with the equivalent Aspire version.
For example:
Aspire.Npgsql.EntityFrameworkCore.PostgreSQL
replaces
Npgsql.EntityFrameworkCore.PostgreSQL
in your API or data project.
When you add the Aspire version, there is no need to also include the standard version. It’s already included.
The AppHost
Aspire is centered around a project called the AppHost. The AppHost provides you a central location for the configuration and orchestration of the various pieces of your application and how they communicate with each other.
In Aspire’s AppHost you will define all of your services and dependencies in code. It is this central application that you set as your StartUp project and what you will run when you are debugging locally. From this central location, all the various pieces of configuration will be parsed out to all the other sections of your application.
The primary class of the AppHost project is the AppHost.cs file. This is where you will write the configuration code of your solution and how the various pieces will talk to one another. It should be noted that in earlier versions of Aspire, it was Program.cs, so you may see that instead of AppHost.cs in older projects.
Let’s take a look at an example of the typical AppHost.cs file.
var builder = DistributedApplication.CreateBuilder(args);

// Add PostgreSQL database
var postgres = builder.AddPostgres("postgres")
    .WithImage("postgres", "16")
    .WithEnvironment("POSTGRES_DB", "exampledb");

var postgresdb = postgres.AddDatabase("exampledb");

// Add API service with database reference
var apiService = builder.AddProject<Projects.CopilotTest_ApiService>("apiservice")
    .WithHttpHealthCheck("/health")
    .WithReference(postgresdb)
    .WaitFor(postgres);

// Add Web project with API service reference
builder.AddProject<Projects.CopilotTest_Web>("webfrontend")
    .WithExternalHttpEndpoints()
    .WithHttpHealthCheck("/health")
    .WithReference(apiService)
    .WaitFor(apiService);

builder.Build().Run();
Here we have represented in C# code our sample solution. In this solution we have a web application, an API, and a PostgreSQL database. Each piece of the application is represented in code. The configuration of each piece is assigned to a variable, and the AppHost passes that variable to the other pieces that need to know about it in the “.WithReference” calls.
In our example here, we set up a Docker instance of PostgreSQL, with a version 16 image, and a database named exampledb. Our API service needs to know about the database instance and how to connect to it, so in our API service builder, we pass in “.WithReference(postgresdb)“. This ensures that our API service has access to the connectionstring that points to our Docker instance.
Let’s look at how that’s handled in the Program.cs file in our API service:
// Add PostgreSQL DbContext with Aspire
builder.AddNpgsqlDbContext<CopilotTestContext>("copilotdb");
That’s it. That’s all we need to add in our Program.cs file. That reference to the “copilotdb” database will be enough for Aspire to replace it with the connectionstring needed. As long as we make sure the names match (“copilotdb”), we don’t have to do anything else.
Next, our web app needs to know where to look for our API service. In our AppHost.cs we added “.WithReference(apiService)“. And then, in the Program.cs of our web application, we have the following:
builder.Services.AddHttpClient<WeatherApiClient>(client =>
    {
        // This URL uses "https+http://" to indicate HTTPS is preferred over HTTP.
        // Learn more about service discovery scheme resolution at https://aka.ms/dotnet/sdschemes.
        client.BaseAddress = new("https+http://apiservice");
    });
When the app runs, Aspire will replace that value of “apiservice” with the URI of the API service when it is running.
It’s just that easy to get up and running. By default, for things like databases and Redis caching and so forth, Aspire will make use of Docker containers, but that is by no means necessary. You can easily set up the AppHost to make use of any instance you have access to, be it locally installed or remote. The documentation for each of the packages includes details on how to do this. For example, to reference a local instance of a PostgreSQL database, we would call “builder.AddConnectionString()” and add the connectionString to our AppHost’s appsettings.json file instead of calling “builder.AddPostgres()“. That’s it. Everything else remains the same in our AppHost.cs file.
What Does That Mean and Why Should I Care?
So, you might be saying: “Sure, it helps with some configuration. That’s not that big a boost.” While I think that alone is a pretty big benefit, you’re absolutely right: it’s not a huge boost. But that’s not all Aspire gives you. The best parts come when it’s time to debug your application. In an Aspire app, you run the AppHost project. It handles spinning up and launching all the other projects in your solution. When the AppHost runs, Aspire launches into the dashboard.
In the screenshot above, you can see all three of our components—a PostgreSQL database, an API service, and a web application—all up and running. For each piece, you can see its current state, and for apps that support it, links you can click on to open it in a browser tab.
The Actions column allows us to start, stop, and restart any of these services individually. We can also code custom buttons to be added to the Actions list to allow us to do things like: clear the cache, add sample data to our database, launch a different application to run tests, whatever we want. If you can write some code to do it, you can add a button to launch it from the dashboard.
The Console Tab
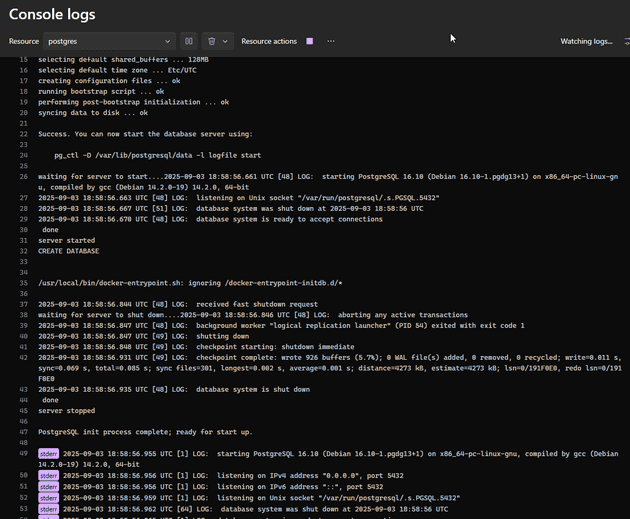
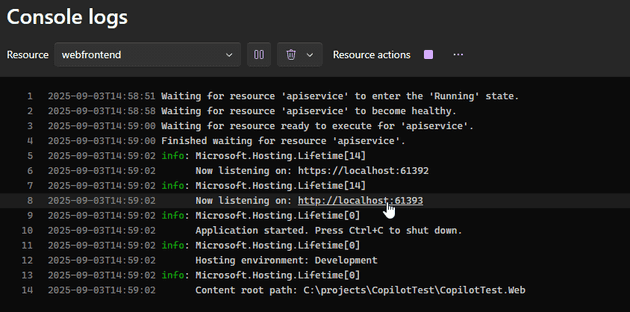
There’s also a button to jump directly to the console logs. Aspire supports the OpenTelemetry standard, and makes it really easy to add that to our applications. We can see all the logging output right from the dashboard, in real time.
You can pause the logs, clear the output, add or hide the timestamps, or export the logs to files for more detailed analysis. If any of the logs contain URLs, those are also clickable, opening up in a new browser tab.
The Structured Tab
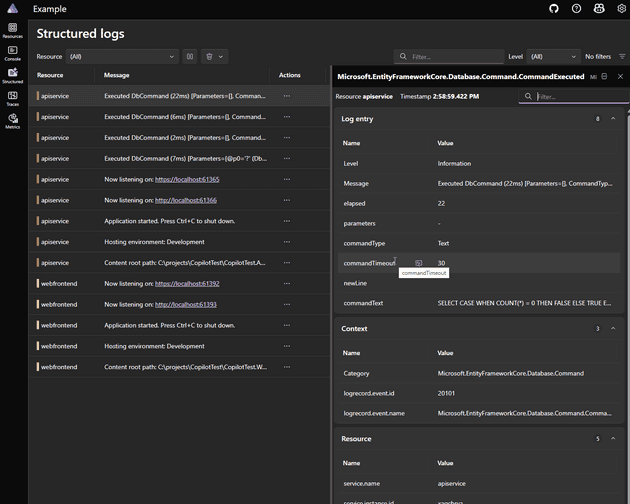
In the structured tab, you can dig deeper into the logs, allowing you to see more details regarding each step in the logs and what they are doing. The structured logs allow you to see specific details about certain types of log entries, letting you do a deep dive into what your code is doing and how it’s acting across your whole application.
The Traces Tab
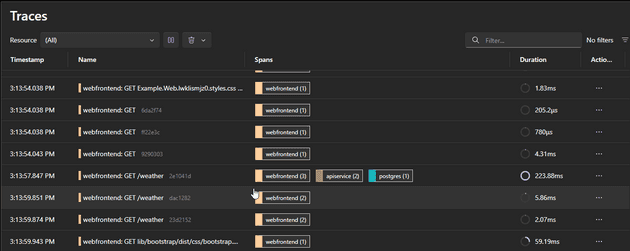
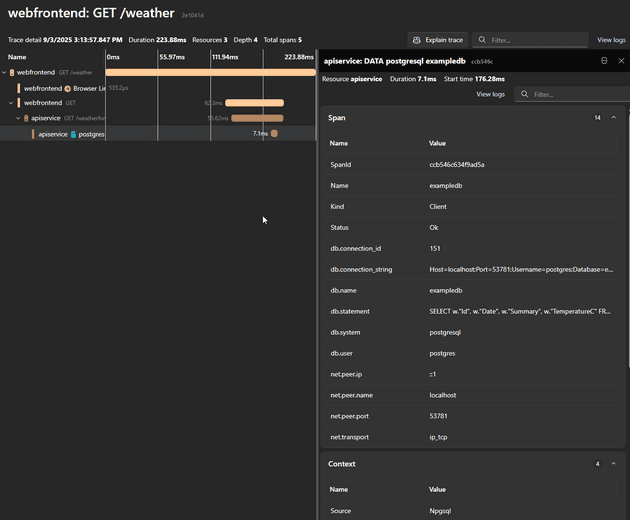
But the real hero of the Aspire dashboard is the Traces tab. Traces lets you walk through every step of what your code is doing in response to the various commands and actions in a visual and detailed form. It starts with the top tier.
This lets you see what’s going on and which pieces of your application are involved in a particular activity. Let’s click on the GET /weather action. That will bring up a detailed timeline view showing how long each piece of the call and response took to complete.
Let’s say we want a more detailed view of what happens in each step. We can click on each piece of the trace timeline and a detail view will appear. For example, clicking on the postgres segment will tell us about the database called, the user used to make the call, and the exact SQL used to make the call to our database.
The Metrics Tab
There’s also a metrics tab to provide details regarding our server resources and how they are being used in real time. This can be particularly useful in determining how hard various resources get hit during specific activities as you test your application.
I hope you’re starting to see the value of .NET Aspire and what it offers for developers.
Adding Aspire To Existing Applications
That’s all well and good if you’re starting from scratch. But most of us are not so lucky. How easy is it to add .NET Aspire to an existing application. And the answer is… pretty darn easy.
- Add a new project to your solution. Choose the template for “.NET Aspire AppHost”
- Set your new project as the startup project
- Add Project References from the AppHost project to the other projects in your solution.
- Update your AppHost.cs file to provide whatever config is needed for each project, including adding any needed “Aspire.Hosting.” packages to support those pieces you have in place.
- Update the config in each of the client projects to reference the names given in the AppHost.cs file, including adding any of the needed “Aspire.” Nuget packages for each client, instead of any configuration that’s set in the client packages.
That’s it. Obviously, a large, complex project will take longer than a simple one to migrate, and you don’t have to do it all at once. But you will see immediate benefits to your development process even by just getting a couple pieces in place.
Production
But what about deploying to production? Well, Aspire is somewhat structured around container-based apps and will provide the most benefit for kinds of apps, but it is by no means required. And even non-container-based apps will still reap 95% of the benefits of Aspire. And when it comes to production deployment, that’s where that extra 5% will come into play for those container-based apps. Deploying to Azure Containers is built-in and there is an excellent community built tool for deploying to Kubernetes clusters called Aspir8. But you don’t have to make use of any of it. With a little configuration in your apps, you can deploy however you want to whatever platform you want, just as you always have.
Want to use Azure SQL instead of SQL Server in a container? Go for it. Want to use Azure App Service? No problem. Want to use Github CI/CD to push to AWS? No sweat. Just do what you’ve always done. All it takes is a little bit of configuration so your client apps know whether they’re running locally for development and to use Aspire, or being deployed to a server, and thus use appsettings.json or whatever else.
Bringing It All Together
.NET Aspire provides a tremendous amount of value to every developer, and to all but the simplest apps. It doesn’t have to be a .NET application, or even a cloud based application. The Community Toolkit adds support for a whole host of other app types, like GoLang, Node.js, Java, and more. Want to add Aspire to a console or a Windows app? Go right ahead. You’ll still get plenty of benefit out of it for development, configuration, and debugging. But for .NET developers working on cloud-based apps—with tracing, log tracking, configuration, and so much more—.NET Aspire can take your development efforts to a whole other level.


